Dragging markers to change image size is the essential feature in all picture editor apps. Lots of programmers know how to implement the drag and change size feature. But very little people know the mechanism behind the simple formula. In this tutorial, we will talk about how to calculate the final width and height of the image after dragging the right bottom markers.
Change Image Size by Dragging Right Bottom Markers Without Rotation
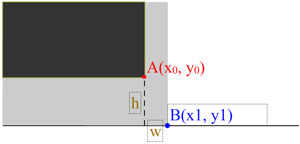
When we talk about changing width and height of one image, or one display object. There are always two situations, without rotation or with rotation. In the without rotation case, the width and height calculation is very simple. Let’s see the following graph.

As you can see in the above graph, when we drag the marker from point A(x0, y0) to point B(x1, y1), the final width and height of the image will be:
width = width + (x1 - x0);
height = height + (y1 - y0);
Change Image Size by Dragging Right Bottom Markers With Rotation
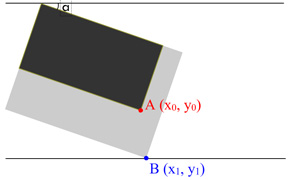
Now, let’s talk about how to calculate the width and height after image is rotated. This case is more complicated than the one without rotated. We need to have the basic trigonometric functions knowledge. In the follow example, we will drag point A to point B of image, which is rotated with α degree. The result will look like:

To get the increment of width and height, we need to use Math knowledge to solve the problem. First of all, let’s find out where is the increment of width and height.

The above graph shows where is the increment of width and height. Now I will show you how to calculate the increment.

After we drag point A(x0, y0) to point B(x1, y1), we can get:
AC = y1 – y0;
BC = x1 – x0;
AD = AC / sinα;
CD = AD x cosα;
CD = BC + BD;
Therefore, we can get BC + BD = AD x cosα; We put all above formula, the result will be:
(x1 – x0) + BD = (y1 – y0) / sinα x cosα;
Let’s make the above formula simple, the result will be:
BD = (y1 – y0) / sinα x cosα – (x1 – x0);
Because triangle BDE is a right triangle, we can get length of BE:
BE = BD x sinα;
BE = ((y1 – y0) / sinα x cosα – (x1 – x0)) x sinα;
BE = (y1 – y0) x cosα – (x1 – x0)) x sinα;
As we know that the BE is the increment of the height, the final height will be:
height = height + (y1 - y0) x cosα - (x1 - x0)) x sinα;
As the same theory, we can get:
DE = BD x cosα;
DE = ((y1 – y0) / sinα x cosα – (x1 – x0)) x cosα;
DE = cos²α x (y1 – y0) / sinα – (x1 – x0)x cosα;
DE = AD – AE;
cos²α x (y1 – y0) / sinα – (x1 – x0)x cosα = (y1 – y0) / sinα – AE;
AE = (y1 – y0) / sinα – cos²α x (y1 – y0) / sinα + (x1 – x0)x cosα;
AE = (y1 – y0) x (1 – cos²α) / sinα + (x1 – x0)x cosα;
Becuase sin²α + cos²α = 1, we will get the final AE formula:
AE = (y1 – y0) x sin²α / sinα + (x1 – x0)x cosα;
AE = (y1 – y0) x sinα + (x1 – x0)x cosα;
As AE is the increment of the width, the final width and height will be:
width = width + (y1 - y0) x sinα + (x1 - x0)x cosα;
height = height + (y1 - y0) x cosα - (x1 - x0)) x sinα;
Here is an drag to change image size example in flash: