With 10 years development experience, I just feel a little bit tired on programming career. In the past 10 years, there are several frontend technologies which are created and promoted by companies. From 2006 to present, I have used several technologies including Openlaszlo (an open soruce platform for development of RIA), Flex, Flash, PHP, HTML, CSS, Javascript, Android, and iOS Objective-C and Swift. I waste almost 5 years on RIA development with flash based technologies.
As the rise of Android and iOS, the age of RIA is end. At the same time, because of the performance improvement of Javascript engineer, JS becomes to be the majority solution for browser based application. In the Javascript side, the technology improvement is also changing very quickly. When I just know how to build web application with Backbone, the AngularJS becomes to be the hot topic. You will find out lots of company hiring Javascript developers who have AngularJS experience. After I decide to learn AngularJS, people start to work with React. Here are two good reasons for working on ReactJS:
- React is an open source Javascript library to help building high performance Web applications. The feature virtual demo help to improve the HTML DOM rendering performance significantly.
- One way data flow is another good mechanism of ReactJS. Compare with AngularJS’s two-way data binding mechanism, one-way data binding will reduce the model updating complications in big project.
Web Application (H5 Application) Development Tools
Moving from iOS development to web application development is a very tough decision. Different from iOS development or Android development, there is no official dev for html5/javascript/css. To develop web application or H5 application, we need to know several tools.
- Node.js and npm
- Git
- Babel
- Browserify or Webpack
- Watchify
- Envify
- Uglifyjs
- Grunt
- React Development Tool (Chrome or Firefox extension)
Local version control tool.
It is a tool to convert EcmaScript6 (Ecmascript 2015) to ES5. It also makes JSX working. You can find more information about JSX and babel here.
It is a bundling tool to help you bundle your modules to be used in a browser environment. Webpack offers many tools, but Browserify can do the same thing with plugins.
Update any source file and your browserify bundle will be recompiled on the spot.
This is a great tool to replace Node-style environment variables with plain strings.
It is a JS compressor tool.
It is a tool to make all your jobs automation.
For more information about web application development tools, you can check this “npm vs bower vs browserify vs gulp vs grunt vs webpack”
Build Web Application with React
As a beginner of web application development, I start my new journey from Facebook React Doc. The Facebook React document page provides a great example to show us how to build a web application from the ground up. React App uses states to maintain the data model and update the UI automatically. However, this is just a simple web application. If the application is very complex and we need to design the app to fit MVC, we can build this kind of H5 web applications followed by Flux application architecture.
Build Web Application with React and Flux
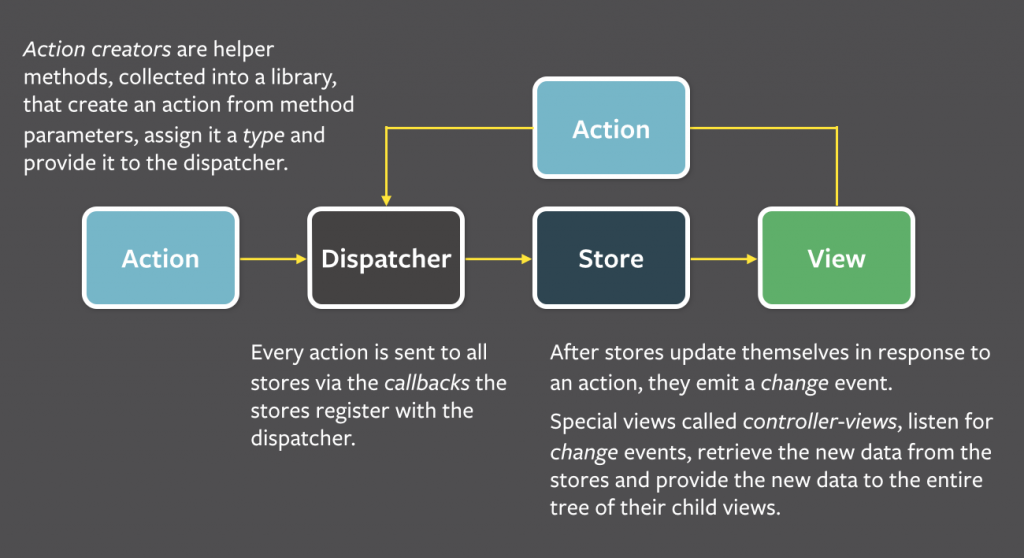
Here is the where I learn Flux, Facebook Flux. The concept of Flux is one direction data flow. Here is a concept to describe the Flux data flow concept.
Flux-todomvc is one of the best online Flux practices. It provides a very good example to show how to build an application with Flux architecture. For more information, you can check the project page on Github.
However, for people who don’t have any experience on React and Flux development with NPM, it is very hard to follow the Flux example to start developing new project. It takes me almost one week to understand all NPM tools and run my first web application successfully.
Steps for Developing React and Flux Web Applications
There is no better way to learn a new technology than building a real project. To learn React with Flux better, I decide to build a web application with React and Flux from scratch. This web application will be a HTML5 digital clock. First, please make sure you have installed NodeJS and Git on your system. Then, I will create a project folder simpleclock. Go into simpleclock, I will use git to create a local repository in this folder, so that all files in this folder will be under version control.
git init
Let’s create a simple index.html and folders such as css, js, res. Here is how the simpleclock looks like:

Now, let’s make this project working with NPM. We can run following command to create the package.json. This file will record all project information including project name, description, version, and all required js modules.
npm init
After running the command successfully, we will get a package.json in the project folder. Here is how my package.json looks like:
{
  "name": "simpleclock",
  "version": "1.0.0",
  "description": "a simple flux-react web application",
  "main": "js/app.js",
  "scripts": {
    "test": "echo \"Error: no test specified\" && exit 1"
  },
  "keywords": [
    "react",
    "flux",
    "npm",
    "git"
  ],
  "author": "james liu",
  "license": "ISC"
}
As this project will be implemented by React and flux, so we need to add some dependent js library modules:
npm install -g browserify
npm install --save react react-dom flux //install react, react-dom, and flux
npm install --save-dev browserify babelify babel-preset-react //install browserify babelify and babel-preset-react which we are developing the web application
After running above command, the package.json changes like this:
{
  "name": "simpleclock",
  "version": "1.0.0",
  "description": "a simple flux-react web application",
  "main": "js/app.js",
  "scripts": {
    "test": "echo \"Error: no test specified\" && exit 1"
  },
  "keywords": [
    "react",
    "flux",
    "npm",
    "git"
  ],
  "author": "james liu",
  "license": "ISC",
  "dependencies": {
    "flux": "^2.1.1",
    "react": "^15.2.1",
    "react-dom": "^15.2.1"
  },
  "devDependencies": {
    "babel-preset-react": "^6.11.1",
    "babelify": "^7.3.0",
    "browserify": "^13.0.1"
  }
}
Babelify and babel-preset-react will help us to explain JSX code when we are building React components. But we need to configure Babelify in package.json. I will put the configuration after devDependencies section. The new package.json will looks like:
{
  "name": "simpleclock",
  "version": "1.0.0",
  "description": "a simple flux-react web application",
  "main": "js/app.js",
  "scripts": {
    "test": "echo \"Error: no test specified\" && exit 1"
  },
  "keywords": [
    "react",
    "flux",
    "npm",
    "git"
  ],
  "author": "james liu",
  "license": "ISC",
  "dependencies": {
    "flux": "^2.1.1",
    "react": "^15.2.1",
    "react-dom": "^15.2.1"
  },
  "devDependencies": {
    "babel-preset-react": "^6.11.1",
    "babelify": "^7.3.0",
    "browserify": "^13.0.1"
  },
  "babel": {
    "presets": [
      "react"
    ]
  }
}
At current stage, index.html is still empty. But it doesn’t bother us right now. Let’s go into js folder and setup the flux architecture folder structure. According to Flux architecture, we need to create some folders including actions folder, components folder, dispatcher folder, and stores folder. At the same time, let’s create a empty app.js file. It will be the entry point of the whole project. Later, we will write the code inside.

Go into folder components, and create a SimpleClock.react.js file. I will create a simple timer component in this file with React. Here is the example source code:
var React = require('react');

var SimpleClock = React.createClass({
    render: function() {
        return (
            <div>
                <div>
                    <span className="clock-title">Current Time: </span><span>00</span>:<span>00</span>:<span>00</span>
                </div>
            </div>
        );
    }
});

module.exports = SimpleClock;
Let’s come back to outside js folder and edit the app.js file. Here is the example source code:
var React = require('react');
var ReactDom = require('react-dom');

var SimpleClock = require('./components/SimpleClock.react');

ReactDom.render(
    <SimpleClock />,
    document.getElementById('content')
);
Do you remember we installed the browserify tool by npm just now. Right now, we will use browserify to bundle all js files into a single js file bundle.js with following command line:
browserify -t [babelify] js/app.js -o js/bundle.js
Here is the final folder structure for this project:

Don’t forget that index.html is still empty. In above step, we bundle all js files in bundle.js file. In index.html file, we just need to refer bundle.js. Here is the example source code of index.html:
<html>
    <head>
        <meta charset="UTF-8" />
        <title>Simple React & Flux Example: Clock</title>
        <meta name="viewport" content="width=device-width, initial-scale=1">
    </head>
    <body>
        <!-- All React components will be rendered in this div! -->
        <h1>Simple Clock v1.0.0</h1>
        <div id="content"></div>

        <script src="js/bundle.js"></script>
    </body>
</html>
After running the index.html in the browser, the app looks like:

Successfully! This is the first version of our SimpleClock React-Flux project. Currently, we haven’t used action, dispatcher, and store in the app. In next version, I will complete this react application with all Flux features.
Build React App with Flux Framework
In above example, I successfully build a simple clock with React. But I just use React to render the user interface. In this new version, I will add more user interactivities including start button, stop button, and automatically updating function.
Facebook recommends to implement React applications with Flux architecture. Actually, I already build the folder structure with Flux architecture at the beginning. All UI components created by React are put in components folders. All other flux modules will be put in corresponding folders. In this example, all source code will be based on Facebook Flux example Todo List.
Create Dispatcher
First, let’s create the dispatcher first. Go to folder js/dispatcher and create AppDispatcher.js file. To make it simple, I just use the Flux default dispatcher. Here is the example source code:
var Dispatcher = require('flux').Dispatcher;
module.exports = new Dispatcher();
Create Store
Store will handle all data updating and notify all registered listeners to update user interface basing on specific dispatched actions. Before creating the store, we may create a class which contains all constant variables. Let’s create a js/constants and create ClockConstants.js files. Here is the source code example:
var keyMirror = require('keymirror');

module.exports = keyMirror({
    CLOCK_START: null,
    CLOCK_STOP: null,
    CLOCK_UPDATE_TIMER: null
});
In this file, we need the keymirror module. So run following command line to download the keymirror module.
npm install --save keymirror
After that, let’s go to folder js/stores and create ClockStore.js file. Here is the source code example:
var AppDispatcher = require('../dispatcher/AppDispatcher');
var EventEmitter = require('events').EventEmitter;
var ClockConstants = require('../constants/ClockConstants');
var assign = require('object-assign');

var CHANGE_EVENT = 'change';

var currentTime = {hour: '00', minute: '00', second: '00', millSec: '000'};

function update(newTime) {
    assign(currentTime, newTime);
}

var ClockStore = assign({}, EventEmitter.prototype, {
    getCurrentTime: function() {
        return currentTime;
    },

    emitChange: function() {
        this.emit(CHANGE_EVENT);
    },

    addChangeListener: function(callback) {
        this.on(CHANGE_EVENT, callback);
    },

    removeChangeListener: function(callback) {
        this.removeListener(CHANGE_EVENT, callback);
    }
});


//Register callback to handle all updates
AppDispatcher.register(function(action) {
    var nowTime;

    switch(action.actionType) {
        case ClockConstants.CLOCK_UPDATE_TIMER:
            nowTime = action.time;
            if (nowTime) {
                update(nowTime);
                ClockStore.emitChange();
            }
            break;

        default:
            //no operation
    }
});

module.exports = ClockStore;
Store in FLux does 3 jobs:
- Maintain the data
- Provide function for View to register and notify registered view
- Register itself with dispatcher
When there is an action triggered, the dispatcher will notify all registered stores. The stores will check the action type and decide if they have notify all registered views. In next step, I will create an action class and define some actions inside.
Create Action
To create actions, let’s go to js/actions folder and create ClockActions.js file. Here is the example source code:
var AppDispatcher = require('../dispatcher/AppDispatcher');
var ClockConstants = require('../constants/ClockConstants');

var ClockActions = {
    updateTimer: function(timeStamp) {
        AppDispatcher.dispatch({
            actionType: ClockConstants.CLOCK_UPDATE_TIMER,
            time: timeStamp
        });
    }
};

module.exports = ClockActions;
In ClockActions, I just define an action CLOCK_UPDATE_TIMER. When we trigger this action with timeStamp data, the action will be dispatched by AppDispatcher. All stores registered in AppDispatcher will be notified by the dispatcher.
Now, here is a question? Who will trigger the action? This is a comment on Facebook official website:
When new data enters the system, whether through a person interacting with the application or through a web api call, that data is packaged into an action
In my example, I will use timer to trigger the action. The timer will be activated in the view. Therefore, I will update my view a little bit.
Create View
The View is built with React. In the new version, I will only update the file js/components/SimpleClock.react.js. In this file, I register the view on ClockStore and add a timer to trigger ClockActions.updateTimer with current time object. Let’s check the source code:
var React = require('react');
var ClockStore = require('../stores/ClockStore');
var ClockActions = require('../actions/ClockActions');

function getTodoState() {
    return {
        currentTime: ClockStore.getCurrentTime()
    };
}

var SimpleClock = React.createClass({
    propTypes: {
        clockTitle: React.PropTypes.string.isRequired,
    },

    getInitialState: function() {
        return getTodoState();
    },

    componentDidMount: function() {
        ClockStore.addChangeListener(this._onChange);
    },

    componentWillUnmount: function() {
        ClockStore.removeChangeListener(this._onChange);
        clearInterval(this.interval);
    },

    render: function() {
        var currentTime = this.state.currentTime;

        return (
            <div>
                <div>
                    <span className="clock-title">{this.props.clockTitle}: </span>
                    <span>{currentTime.hour}</span>:<span>{currentTime.minute}</span>:<span>{currentTime.second}</span>:<span>{currentTime.millSec}</span>
                </div>
                <div><button onClick={this._onStart}>Start</button></div>
                <div><button onClick={this._onStop}>Stop</button></div>
            </div>
        );
    },

    //private method
    _onChange: function() {
        //get data from store
        this.setState(getTodoState());
    },

    _onStart: function() {
        this.interval = setInterval(function() {
            var d = new Date(); // for now
            var time = {hour: d.getHours(), minute: d.getMinutes(), second:d.getSeconds(), millSec:d.getMilliseconds()};
            ClockActions.updateTimer(time);
        }, 1);
    },

    _onStop: function() {
        clearInterval(this.interval);
    }
});

module.exports = SimpleClock;
The source code is a little bit longer. But it is quite simple to understand. Here are several jobs done by this view:
- propTypes: define what types of prop the view accepts
- getInitialState: initialize the value of this.state
- componentDidMount: register itself on store after the initial rendering occurs
- componentWillUnmount: unregister itself from store and clear the timer
- render: render the view
- _onChange: callback function for store
- _onStart: onClick function for start button. This function will start a timer to trigger the action
- _onStop: onClick function for stop button. This function will clear the timer to stop triggering the action
Play the React/Flux Demo
Here is the final version of this example, though there are still something I can improve. For example, I should define more actions for start button and stop button. So when user clicks on start button or stop button, the specific action should be triggered and the store should update the data after getting the action dispatched from AppDispatcher, then notify the view to update the state and start the timer. But at this moment, this example is good enough to show how to create a simple React web application with Flux architecture.