
There is no end to learning. This time, I just have a small step on J2EE, although it’s actually not a very new technology. J2EE starts from 1999, was known as Java 2 Platform, Enterprise Edition. Now it was the most popular platform to develop enterprise applications, especially to develop big platforms. I am a full stake developer who knows html5, javascript, php, mysql, Java and Python. Somebody may think that Java is J2EE. That comment is totally wrong. As my understand, Java is just a programme language, which is used to develop Android apps or Java applications, or J2EE applications. J2EE is a platform. On the platform, we can take the advantage of several frameworks to develop a stable, solid, robust and professional applications, with fewer efforts. When I am writing this article, most J2EE developers are using Spring Boot and Mybatis with Mysql to develop website applications. If the application is more sophisticated, it will also involve other technology such as Redis, Memcached, or Kafka seperately or together. In this post, I will just try to setup an J2EE application with String Boot and Mybatis. For database, I will use MySQL.
Prepare the Working Environment for J2EE
Please choose the best development tools for J2EE application. It will save you lots of time. I am using Eclipse for Java EE. Please download the latest version and install the plugins for Spring boot. Currently, it’s named Spring IDE and Spring Tool Suite, or STS in short. It’s better to install another plugin, MyBatis Generator. It will help us automatically generate MyBatis related java classes and xml files. For more installing details, you’d better to search on Google with “HOW TO” keywords. Please also don’t forget to install Mysql on your development machine. Here I am using the Windows 10, with Eclipse Oxygen 2.

Start J2EE Application Development with Spring Boot and Mybatis
Though I want to save my time to omit some duplicated content which it can be easily searched online, it’s better to repeat here to save my readers time. In this step, I guess you already get your working environment ready. Launch the eclipse and create a new project from menu “File”->”New”->”Project”.
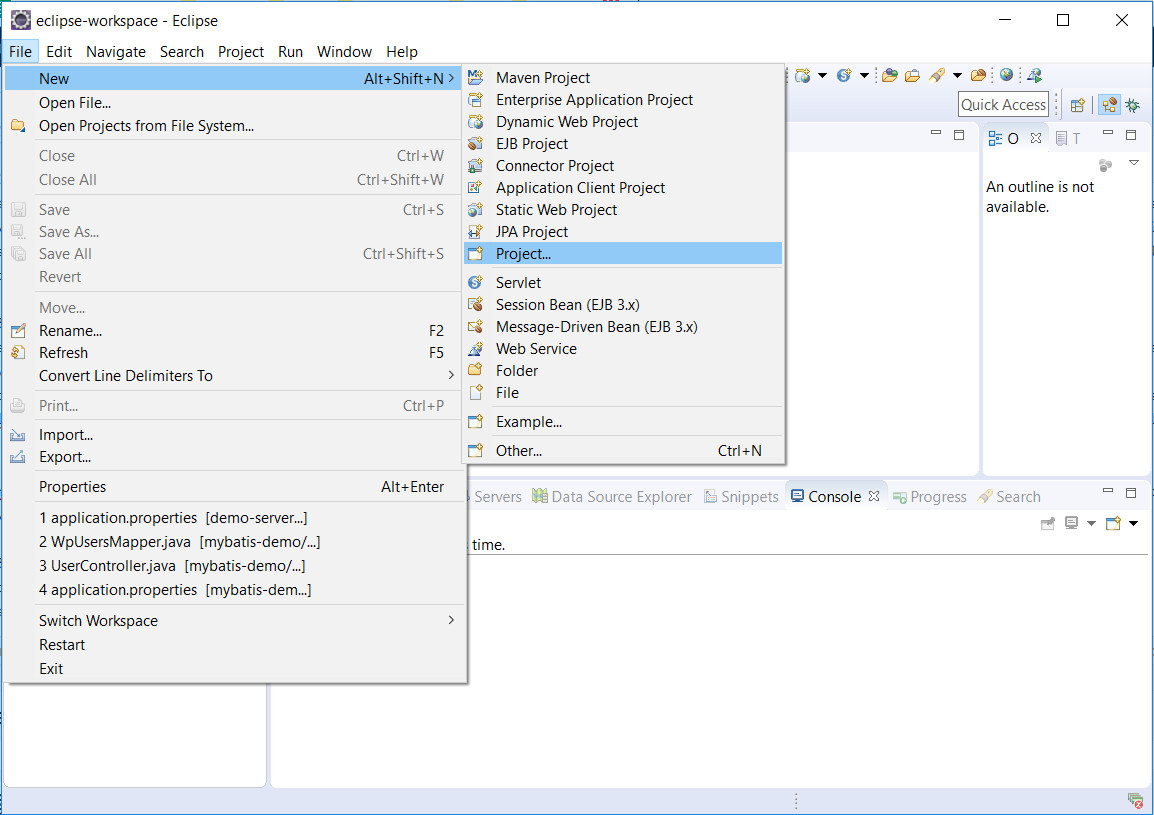
In the popup window, choose “Spring Starter Project”.

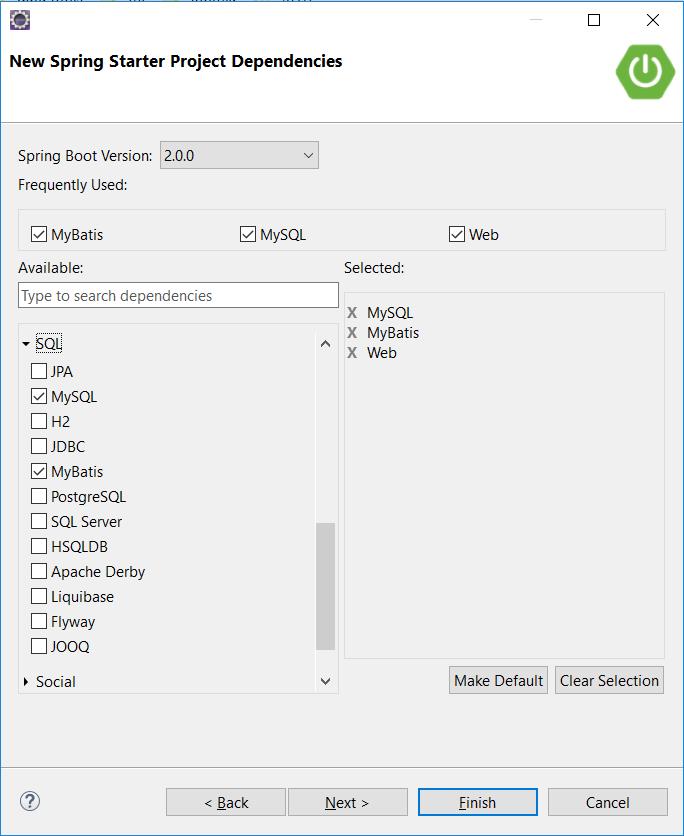
Then, type all your project information in the coming popup window:

Next, please add all dependencies which we need in your project. In my example, I add Web, MyBatis, and MySQL. After that, click Finish button.
Create MyBatis Class Files and XML Files
Under MyBatis help, we can easily manage our application interfaces to communicate with databases.
Get Your Database Ready
Here I will not mention too much. After you setup a Mysql database on Windows 10. You can create a simple database with a simple table. Later, we will use “MyBatis Generator” plugin to create MyBatis files automatically.
Run MyBatis Generator Plugin
Now, let’s prepare MyBatis Generator plugin’s configuration file. We will tell the plugin where to connect the database with what username and password. The configuration file is src/main/resource/generatorConfig.xml under project root folder.

Here is my configuration file example:
<?xml version="1.0" encoding="UTF-8"?>
<!DOCTYPE generatorConfiguration PUBLIC "-//mybatis.org//DTD MyBatis Generator Configuration 1.0//EN" "http://mybatis.org/dtd/mybatis-generator-config_1_0.dtd">
<generatorConfiguration>
  <context id="context1">
    <jdbcConnection connectionURL="jdbc:mysql://localhost:3306/wordpress" driverClass="com.mysql.jdbc.Driver" password="" userId="root" />
    <javaModelGenerator targetPackage="com.james.demo.mybatis.model" targetProject="mybatis-demo/src/main/java" />
    <sqlMapGenerator targetPackage="com.james.demo.mybatis.xml" targetProject="mybatis-demo/src/main/java" />
    <javaClientGenerator targetPackage="com.james.demo.mybatis.mapper" targetProject="mybatis-demo/src/main/java" type="XMLMAPPER" />
    <table schema="utf-8" tableName="wp_users">
      <!-- <columnOverride column="???" property="???" /> -->
    </table>
  </context>
</generatorConfiguration>
It will tell the plugin to connect MySQL server at localhost, port 3306 with empty password and user root. Using the wordpress database. The configuration file also specifies where to save the result files and which tables from database we want to generate for. Once we get the configuration file ready, we can run the plugin to generate all MyBatis files by right clicking the generatorConfig.xml file, select “run as”->”run MyBatis Generator”

In the end, we will get all files in specified folders in the configuration file. Then, we can access the database by invoking the corresponding interfaces.

Get Data From MySQL by MyBatis in Spring Boot
Now, we have all MyBatis interfaces and we can use these interfaces in our Spring Boot J2EE project.
Configure MyBatis to Connect MySQL Server
Before we can access the database in J2EE project, we have to add some configuration information in application.properties file under resources folder. Please check my application.properties example:
spring.datasource.driverClassName = com.mysql.jdbc.Driver
spring.datasource.url = jdbc:mysql://localhost:3306/wordpress?useUnicode=true&characterEncoding=utf-8
spring.datasource.username = root
spring.datasource.password =

mybatis.type-aliases-package=com.james.demo.mybatis.model
mybatis.mapper-locations=com/james/demo/mybatis/xml/*.xml
Please double check the content as it could cause MyBatis error if there is any mistake.
Get Data From MySQL BY Calling MyBatis Interface
Now, let’s create a request controller which will call the MyBatis interface and retrieve data from MySQL server. I create UserController.java under package com.james.demo.web.controller. Here is the source code:
package com.james.demo.web.controller;

import org.springframework.beans.factory.annotation.Autowired;
import org.springframework.web.bind.annotation.RequestMapping;
import org.springframework.web.bind.annotation.RestController;

import com.james.demo.mybatis.model.WpUsers;

import com.james.demo.mybatis.mapper.WpUsersMapper;

@RestController
public class UserController {
	@Autowired
	WpUsersMapper userDao;

    @RequestMapping("/user")
    WpUsers getUser() {
    	WpUsers user = userDao.selectByPrimaryKey((long) 1);
    	return user;
    }

    @RequestMapping("/test")
    String showWelcomeMsg() {
    	return "Hello World";
    }
}
Tell Spring Boot To Load MyBatis Mapper Classes
This step is very important. It will tell Spring Boot where to load all MyBatis Mapper classes. Here I will add @MapperScan annotation in my application class. Here is the example source code:
package com.james.demo;

import org.mybatis.spring.annotation.MapperScan;
import org.springframework.boot.SpringApplication;
import org.springframework.boot.autoconfigure.EnableAutoConfiguration;
import org.springframework.boot.autoconfigure.SpringBootApplication;

@MapperScan("com.james.demo.mybatis.mapper")
@EnableAutoConfiguration
@SpringBootApplication

public class MybatisDemoApplication {

	public static void main(String[] args) {
		SpringApplication.run(MybatisDemoApplication.class, args);
	}
}
Run Project
Let’s run the project by right clicking project and select “Run As”->”Spring Boot Project”. If you don’t get any error messages or any warning messages, you can test your J2EE web application by access the url “http://localhost:8080/user” in your browser. You will get your data from MySQL database within one second.
Kindly can you provide a repo containing the sample code
Yo, please check this: https://github.com/jamesliu668/springboot-mybatis-mysql-demo