These days I am working on the push notification features on my ios app project. It takes me two days to reading round and try some example code. In the end of the second day, I finally make it working well. Looking at the whole learning progress, I am so surprised that how poor the Apple developer guide is. For beginners, 90% of them will go to Apple official website to find the learning materials. However, you will never get a working app with push notification feature if you follow the apple developer instruction, as well as another apple push notification tutorials. Nevertheless, they are still useful after you combine these guides together. That’s the reason why I want to write down this post.
what’s the apple push notification services?
As Apple developer guide says:
The Apple Push Notification Service Is the Gateway for Push Notifications
Apple Push Notification service (APNs) propagates push notifications to devices having applications registered to receive those notifications. Each device establishes an accredited and encrypted IP connection with the service and receives notifications over this persistent connection. Providers connect with APNs through a persistent and secure channel while monitoring incoming data intended for their client applications. When new data for an application arrives, the provider prepares and sends a notification through the channel to APNs, which pushes the notification to the target device.
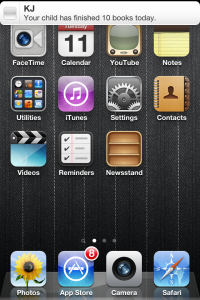
Let’s make it easy. Push notification is way for app providers to send notification to iphone or ipad which install your app, and you must put special code to enable your app to be able to receive the push notification. After your device, for example, your iphone gets the notification, it will popup one notification alert like this:

If you upgrade your apple device such as iPhone, iPad, iPod touch to IOS 5, the default notification will appear in banners style. It will look like this:

How to set push notification alert style?
First of all, push notification alert style is allowed apple device user to customized their notification appearance. In IOS5, the default style is banners. We can not specify the push notification alert style in our apps. Only the user can choose which way they want to show the notification alert. Here are the steps for you to change notification alert styles on your iphone, ipad or ipod touch.
- Open Settings app from your device home screen
- Select ‘Notifications’ settings pane
- Select the app you want to change the alert style
Then, you will see the configuration screen like this:

Build Your Push Notification Apps with PHP
To build push notification in your apps, you need to understand how push notification works. There are 3 roles in the whole process, apple device, apple push notification server (APNS), and your server (provider). First, user apple device, such as ipad, iphone or ipod touch, needs to register to APNS once users run the your app. If the registration is successful, it will return an device token to your app which is unique id according to device and app. After that, your app needs to pass the device token to your server (provider) and you need to save that token. The following diagram shows you how the process looks like:

At this stage, you already have the necessary information from users device. Next step, you can connect to apple push notification server (APNS) via the SSL connection. After authentication, you are able to send out the notification message to a specific device with that device token. The provider server side, we can use most common backend language to implement, such as Ruby, Perl, Java, C#. In this beginners guide, we will use php to write the provider end service.

Get Certification For Apple Push Notification SSL Connection
For beginners, I suggest you use ApnsPHP, Apple Push Notification and Feedback provider. It is an open source project for apple push notification provider service which is hosted on google code. Here is the hosting page. To make your provider service working, you need to prepare following file:
- SSL certification and private key file in pem format;
- Entrust Root Certificaion
- ApnsPHP source code
8 Steps to Get Your Apple Push Notification Services Certificate P12 and PEM File
There is a guide to tell you how to get the ssl certification and private key file in .p12 format in Apple official developer guide. However, the instruction for creating .pem format is not correct. Here are the steps to help you create the right certification in pem format. One thing need to be mentioned, you need to do all the steps in Mac OS system, not in Windows.
- Open Keychain Access utility
- Click the My Certificates category in the left pane
- Find the certificate you want to install
- Disclose its contents and you’ll see both a certificate and a private key.
- Select both the certificate and private key
- Choose File > Export Items, and export them as a Personal Information Exchange (.p12) file, for example, apns_cer.p12
- Open Terminal and change directory to location used to save apns.p12
- Convert the PKCS12 certificate bundle into PEM format using this command (press enter when asked for Import Password):
openssl pkcs12 -in apns_cer.p12 -out apns_cer.pem -nodes -clcerts
After we got the pem certification bundle, we need to download the Entrust Root Certification from entrust site. Please click here to download Entrust CA (2048) file (The file name will be entrust_2048_ca.cer).
3 Steps to Solve Unable to Connecting Apple Push Notification Sandbox
When you are running ApnsPHP code, you may get following error message:
Unable to connect to ‘ssl://gateway.sandbox.push.apple.com:2195
To solve this issue, you need to change the ApnsPHP source code.
- Open Abstract.php file in ApnsPHP folder
- Search for function _connect()
- Change the code as following example
		$streamContext = stream_context_create(array('ssl' => array(
			//'verify_peer' => isset($this->_sRootCertificationAuthorityFile),
			'cafile' => $this->_sRootCertificationAuthorityFile,
			'local_cert' => $this->_sProviderCertificateFile
		)));