
As one friend’s request, I write this tutorial to demonstrate how to add the push notification in the Androis Rss Reader app with Google Cloud Messaging, just like many other news apps does. When the website publishes a news, the app will get the notification immediately. To implement the push notification in the android app, we need to implement the push notification module in the server side as well. For beginners, it may be complicated. Let’s me explain how push notification works in both server side (the website) and client side (the app).
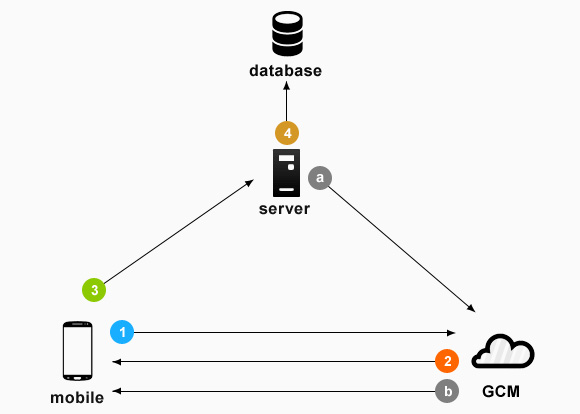
The above image shows the basic push notification working flow. There are 3 roles in the whole flow, your devices, your server and Google Cloud Messaging Server (GCM server). Here are the steps how the push notification works between your devices, your server and GCM server.
- 1. Your devices will send the app server’s sender ID ( the sender id is the project number of your project in your Google Developers Console) to GCM server to register it on GCM server.
- 2. The GCM server will return a registration token to your device.
- 3. Once your device get the registration token, it will send the registration token to your server.
- 4. Your server save the registration token in the database.
After above steps, your devices successfully build the push notification network between your devices, your server and GCM server. The next 2 steps will show you how your server sends push notification to your devices, through GCM server.
- a. Your server send the push notification to GCM server with message context and registration token.
- b. GCM server will push the notification to each device according to the registration given by your server.
Now, let us prepare all the necessary things before writing code. First, you need a proper android device, android phone or android tablet (I will write another tutorial about how to implement push notification in IOS with GCM). Second, you need a proper server or website. Third, you need to create a project in Google developers console.
Prepare an Android Phone Before Writing Code
To make the coding simple and easy to debug, I recommend you to use a proper Android device, which has installed Android 4.0 or higher. Technically, the push notification with GCM will work on Android system as low as Android 2.2. But to avoid unexpected errors, an Android device with Android 4.0 or higher will be preferred.
Set up Server to Send Push Notification
The part requires you have some backend knowledge. In my example, I will use WordPress powered website as my backend server. So my android rss reader app will register on GCM server and get the registration token, then send the registration token to my WordPress website. My WordPress website will save the registration in MYSQL database. When I publish a new article on my WordPress website, my website will send the push notification to GCM server with the registration token.
If you already have a WordPress powered website, you can use my WordPress plugin to enable push notification feature on your website. You can get JMS RSS Feed plugin on WordPress official plugin website.
After you download the JMS Rss Feed plugin, please replace the key with Server API Key of your Google Developers Console project. Below we will talk about how to create a project in Google Developers Console and get the Server API Key.
Create Project in Google Developers Console
There are several ways to create projects on Google Developers Console. To save time and avoid unnecessary troubles, you can follow the Google official Cloud Messaging guides to create the project on Google Developers Console. After this step, you will get two important data, Server API Key and Sender ID. Here are the steps:
1. Go to https://developers.google.com/cloud-messaging/android/start
2. Ignore step 1 “Get the project”
3. Click blue button “GET A CONFIGURATION FILE” (You need to login with your google account)


4. Enable Cloud Messaging Google service, save your “Server API Key” and “Sender ID“. We need to use them later.

5. Click “Close” and you will find “Generate configuration files” button. Click the button to download your google-services.json file.

Further Read:
If You are familiar with Google Developers Console, here are some useful reference about how to enable Google Service API, and how to get Google API Key. The Google API Key I am using is Server Key.
https://developers.google.com/api-client-library/python/guide/aaa_apikeys
Implement Google Cloud Message in Android Rss Reader App
After we get all above job ready, it’s time to add the push notification feature in our Android RSS Reader app. When you create your own project, make sure the package name is the same as what you type in your Google Developers Console project, in above section Create Project in Google Developers Console, step 3.
You can follow Google official user guide to implement GCM in Android app.
https://developers.google.com/cloud-messaging/android/client
The above guide will tell you how to configure your Android project in the Android Studio. In case you still have some problems with your Manifest file, like uses-permission problem, you can check my correct Manifest GCM working example:
<?xml version="1.0" encoding="utf-8"?>
<manifest xmlns:android="http://schemas.android.com/apk/res/android"
    package="com.jmsliu.rssreader" >

    <uses-permission android:name="android.permission.INTERNET" />
    <uses-permission android:name="com.google.android.c2dm.permission.RECEIVE"/>
    <uses-permission android:name="android.permission.WAKE_LOCK"/>
    <uses-permission android:name="android.permission.VIBRATE" />

    <permission android:name="com.jmsliu.rssreader.permission.C2D_MESSAGE"
            android:protectionLevel="signature" />
    <uses-permission android:name="com.jmsliu.rssreader.permission.C2D_MESSAGE" />

    <application
        android:name="com.jmsliu.rssreader.MainApplication"
        android:allowBackup="true"
        android:icon="@drawable/ic_launcher"
        android:label="@string/app_name"
        android:theme="@style/AppTheme" >

        <meta-data android:name="com.google.android.gms.version"
            android:value="@integer/google_play_services_version" />

        <receiver
            android:name="com.google.android.gms.gcm.GcmReceiver"
            android:permission="com.google.android.c2dm.permission.SEND" >
            <intent-filter>
                <action android:name="com.google.android.c2dm.intent.RECEIVE" />
                <!-- for Gingerbread GSF backward compat -->
                <action android:name="com.google.android.c2dm.intent.REGISTRATION" />
                <category android:name="com.jmsliu.rssreader" />
            </intent-filter>
        </receiver>

        <service
            android:name=".service.GcmService"
            android:exported="false" >
            <intent-filter>
                <action android:name="com.google.android.c2dm.intent.RECEIVE" />
            </intent-filter>
        </service>

        <activity
            android:name="com.jmsliu.rssreader.SplashActivity"
            android:label="@string/app_name" >
            <intent-filter>
                <action android:name="android.intent.action.MAIN" />
                <category android:name="android.intent.category.LAUNCHER" />
            </intent-filter>
        </activity>

        <activity
            android:name=".MainActivity"
            android:label="@string/postlistlabel" >
            <intent-filter>
                <action android:name="android.intent.action.MAIN" />
            </intent-filter>
        </activity>
    </application>

</manifest>
Common Uses permission Errors in Manifest File
The most common errors in Manifest File for GCM is uses permission errors. Here is one example:
Permission Denial: Accessing service ComponentInfo{com.google.android.gms/com.google.android.gms.gcm.PushMessagingRegistrarProxy} from pid=1822, uid=10064 requires com.google.android.c2dm.permission.RECEIVE
Caused by: java.lang.SecurityException: Not allowed to start service Intent { act=com.google.android.c2dm.intent.REGISTER pkg=com.google.android.gms (has extras) } without permission com.google.android.c2dm.permission.RECEIVE
When you are using my working example above, please replace my package name “com.jmsliu.rssreader” with yours. This problem will be solved.
Get Registration Token from GCM Server
The next step is registering your device to GCM server by sending the sender id. (You already got the sender id in above section Create Project in Google Developers Console, step 4. Here is the example source code to get the registration token from GCM server.
String token = InstanceID.getInstance(mContext).getToken(senderId, GoogleCloudMessaging.INSTANCE_ID_SCOPE, null);
Common Error in Getting GCM Registration Token
The most common error I get when I am getting the GCM registration token is this:
java.io.IOException: MAIN_THREAD
at com.google.android.gms.gcm.GoogleCloudMessaging.register(Unknown Source)
It is because we are not allowed to calling the register method from the main thread. Therefore, we need to call getToken function in another thread. Here is the complete example source code to get registration token in a different thread.
public void getGcmTokenInBackground(final String senderId) {
	new AsyncTask<Void, Void, String>() {
		@Override
		protected String doInBackground(Void... params) {
			try {
				String token =
						InstanceID.getInstance(mContext).getToken(senderId,
								GoogleCloudMessaging.INSTANCE_ID_SCOPE, null);
				GlobalClass.instance().setGCMToken(mContext, token);
				return token;
			} catch (final IOException e) {
				e.printStackTrace();
			}
			return null;
		}

		@Override
		protected void onPostExecute(String s) {
			InstanceIdHelper.this.registerDevice(s);
		}
	}.execute();
}
Save GCM Registration Token to Server
After you successfully get the token, please save it to your server. In my example, I will send it to my WordPress website, and my website will save it in the MySQL database. Here is the android source code to send the registration token to the server.
public void registerDevice(final String token) {
	new AsyncTask<String, Void, String>() {
		@Override
		protected String doInBackground(String... params) {
			String result = null;
			try {
				String urlParameters = "jms_rss_action=register_android&jms_rss_token=" + params[0];
				byte[] postData = urlParameters.getBytes("UTF-8");
				int postDataLength = postData.length;
				URL url = new URL(GlobalClass.REGISTER_DEVICE_URL);
				HttpURLConnection conn= (HttpURLConnection) url.openConnection();
				conn.setDoOutput( true );
				conn.setInstanceFollowRedirects( false );
				conn.setRequestMethod( "POST" );
				conn.setRequestProperty( "Content-Type", "application/x-www-form-urlencoded;charset=utf-8");
				conn.setRequestProperty( "charset", "utf-8");
				conn.setRequestProperty( "Content-Length", Integer.toString( postDataLength ));
				conn.setUseCaches( false );
				conn.getOutputStream().write(postData);

				int response = conn.getResponseCode();
				Log.d("debug", "The response is: " + response);

				BufferedReader in = new BufferedReader(new InputStreamReader(conn.getInputStream(), "UTF-8"));
				StringBuilder stringBuilder = new StringBuilder();
				String str;
				while ((str = in.readLine()) != null) {
					// str is one line of text; readLine() strips the newline character(s)
					stringBuilder.append(str);
				}
				in.close();

				result = stringBuilder.toString();
			} catch (UnsupportedEncodingException e) {
				e.printStackTrace();
				//result = "Encode URL Error";
			} catch (MalformedURLException e) {
				e.printStackTrace();
				//result = "Invalid URL";
			} catch (IOException e) {
				e.printStackTrace();
				//result = "IO exception";
			}
			return result;
		}

		@Override
		protected void onPostExecute(String s) {
			if(s != null && !s.equals('0')) {
				GlobalClass.instance().setRegisterID(mContext, s);
			}
		}
	}.execute(token);
}
Popup Notification on Android When Getting GCM Message
After we successfully set up the WordPress website with JMS Rss Reader plugin, and successfully get the registration token from GCM server, and save the registration token on our WordPress website. The remaining job is popping up the notification message in Android notification area when we get the GCM message.
Define Android Service to Handle Push Notification
To handle the incoming push notification even when your app is not launched, we need to define an android service running in background. Once there is a push notification, the service will handle it by popping up a dialogue message box or show a notification in the Android notification area.
To define an Android Service, you need to insert following xml in the manifest file:
        <service
            android:name=".service.GcmService"
            android:exported="false" >
            <intent-filter>
                <action android:name="com.google.android.c2dm.intent.RECEIVE" />
            </intent-filter>
        </service>
The above xml will define a service class GcmService to handle the action when there is a push notification coming. Please note that GcmService is in the package com.jmsliu.rssreader.service. Here is the example source code of GcmService class:
public class GcmService extends GcmListenerService {
    @Override
    public void onMessageReceived(String from, Bundle data) {
        //super.onMessageReceived(from, data);
        String message = data.getString("message");
        NotificationCompat.Builder mBuilder =
                new NotificationCompat.Builder(this);
        mBuilder.setSmallIcon(R.drawable.ic_launcher);
        mBuilder.setContentTitle("New Article").setContentText(message);
        //mBuilder.setSound(Uri.parse("uri://sadfasdfasdf.mp3"));
        Uri alarmSound = RingtoneManager.getDefaultUri(RingtoneManager.TYPE_NOTIFICATION);
        mBuilder.setSound(alarmSound);
        mBuilder.setVibrate(new long[] { 1000, 1000, 1000, 1000, 1000 });
        mBuilder.setLights(Color.RED, 3000, 3000);


        Intent mainIntent = new Intent(this, SplashActivity.class);
        // The stack builder object will contain an artificial back stack for the
        // started Activity.
        // This ensures that navigating backward from the Activity leads out of
        // your application to the Home screen.
        TaskStackBuilder stackBuilder = TaskStackBuilder.create(this);
        stackBuilder.addParentStack(SplashActivity.class);
        stackBuilder.addNextIntent(mainIntent);

        PendingIntent pendingIntent = stackBuilder.getPendingIntent(0, PendingIntent.FLAG_UPDATE_CURRENT);
        mBuilder.setContentIntent(pendingIntent);
        NotificationManager mNotificationManager = (NotificationManager) getSystemService(Context.NOTIFICATION_SERVICE);
        //NotificationManagerCompat notificationManager = NotificationManagerCompat.from(this);
        mNotificationManager.notify(12345, mBuilder.build());
    }
}
The above example source code will create a notification with a small icon, title, message, sound, light, and vibrate. When you define a notification, you must set the icon, title and content of the notification. Otherwise, the notification will not show in the Android notification area, without any warnings or errors. Here is the result of my push notification example app screenshot.

Try Example Android App
You can download and install this android app by click the following link, or scan the following QR code to download and install on your android phone simply.
After you install this app, please leave a comment to request sending push notification. When I see your request, I will publish a new article on my testing website http://html5components.net/appgallery/ and you will get the push notification from my website later.
Download and Run Rss Reader App on Your Android Phone

Get Full Improvement Source Code Under $19.99
You will get whole Android Rss Feed App 6.2 source code at $19.99. With this source code, you will get following features:
- Loading RSS Feed from internet
- Parse RSS Feed XML
- Show post title in a list
- Load post featured image
- Change categories in navigation drawer
- Cache image offline
- Get Push Notification from you website. Please make sure your website is powered by WordPress and install my WordPress Plugin JMS RSS Feed Plugin
How to customize the app to use with your website?
After you get this Android app source code, you need to follow these steps to make the app working with your own WordPress powered website properly.
- Make sure your website is powered by WordPress;
- Download and install WordPress Plugin JMS RSS Feed Plugin on your website,
- Find and edit GlobalClass.java, change the WEBSITE value as your own website url
public static final String WEBSITE = "http://yourwebsite.com/"; //your website url
DrawerData data = new DrawerData();
data.title = "All"; //change the name as your want
data.name = ""; //don't change this
data.type = 1; //don't change this
instance.categoryList.add(data);

//start: add your own categories here
data = new DrawerData();
data.title = "Android";
data.name = "android"; //make sure this link http://yourwebsite.com/category/android/feed?paged=1 working in the browser
data.type = 0;
instance.categoryList.add(data);
//end
Hello sir,
Thanks for the tutorial. I sent you a mail but you have not replied.
Sorry, I didn’t get it.
Please create a test post so that i can get the push notification. I have installed the app already.
Sorry for late reply. I will create a post soon.
hello sir,
thanks so much for this tutorial, can you please create a test post so that I can confirm the notification, I have installed the app already. and I also sent you a mail but you have not replied for days now. thanks.
Hello,
Sorry for the late reply. I will create a new post and send the notification.
Thanks
Thank you. I got the notification. Please is this not your email address jmsliudotcom@gmail.com ?
Oh, I don’t check that email very often. If you want to sms me, please use this form:
Contact Us
Ok sir, thanks
I have filled the contact form but i’m still expecting your reply sir. Thanks
I have replied the email.
i have purchased but couldn’t download because of this error :
Warning: session_start() [function.session-start]: open(./tmp/session//sess_49a2f6123a4c0640071088bd8d8e710d, O_RDWR) failed: Disk quota exceeded (122) in /home/taptappi/public_html/jmsliu.com/digitalgoods/session.php on line 11
Invalid Request
Warning: Unknown: open(./tmp/session//sess_49a2f6123a4c0640071088bd8d8e710d, O_RDWR) failed: Disk quota exceeded (122) in Unknown on line 0
Warning: Unknown: Failed to write session data (files). Please verify that the current setting of session.save_path is correct (./tmp/session/) in Unknown on line 0
please check and send me source code
Thanks
Hi, don’t worry about it. I think my server exceed the usage limitation. Now the problem is solved. By the way, I will send you the source code to your email d***********s@gmail.com.
Thank u Sir,
sir, i didn’t get your mail, plz send me mail.
thank u.
i am getting errors while importing project in Eclipse….
please help me
I think it’s a Android Studio Project.
A new Post please
please send me eclipse project, i can’t use android studio….
Android Studio is the Google’s official Android Dev. I don’t work on eclipse any more.
push notification is not working , please make a video tutorial it will help to all users Thanks
Are you sure that you follow the steps I mentioned in the article. The app is working and some of my friend also say it works. (You can check the people who left the message here).
ok, Thank you
Hi, James Liu
I need help to use a mixfeed
in your app.
please, send me an example.
thank you
Nic
A mixfeed?
Dear James, why you are not replying me?????
Hi,
Mix any number of RSS feeds into one unique new feed!
please fix this error and reply me ,
java.lang.IndexOutOfBoundsException: Invalid index 13, size is 1
i have uploaded app on google store but i am getting crash reports, please fix it.
Hello Abdul,
I only provide my working on the website, and I hope that may help you guys. I am sorry that I am too busy to help you debug your customised app.
I can only make sure that the whole project I published here work properly 100%.
hey James,
I had sent you a email with the question where I could have made a mistake because the individual posts are not visible in the app. The push notification works.
Please help
Hello Bil
I didn’t get the email. If you didn’t get the content in your website, please check if you get the rss content properly.
For rss content, you can check this post:
http://jmsliu.com/1508/rss-reader-android-app-tutorial-3-parse-xml-in-android.html
You need to make sure that your rss format is similar with mine.
A new Post please
Hello sir, I want to thank you at first for this tutorial. It’s so beneficial.
I have a question, please. I am using the RSS feed of a website that is not mine. So, I can’t add the “JMS RSS Feed plugin”. Please, is there any alternative way for the method you described above ?
And how about if I am using a website (not a wordpress website) ?
Thank’s in advance
Then, you have to customise the app. Acutally, my app can support all the standard rss feed, but the image. As title image is not defined in the rss feed. Therefore, you just need to delete all code for displaying image.
Dear Sir, i have purchased you code it’s working fine. please fix the crash bug. i am getting crash reports from google play users.
Hello,
Can you provide more crash information?
java.lang.RuntimeException: An error occured while executing doInBackground()
at android.os.AsyncTask$3.done(AsyncTask.java:300)
at java.util.concurrent.FutureTask.finishCompletion(FutureTask.java:355)
at java.util.concurrent.FutureTask.setException(FutureTask.java:222)
at java.util.concurrent.FutureTask.run(FutureTask.java:242)
at android.os.AsyncTask$SerialExecutor$1.run(AsyncTask.java:231)
at java.util.concurrent.ThreadPoolExecutor.runWorker(ThreadPoolExecutor.java:1112)
at java.util.concurrent.ThreadPoolExecutor$Worker.run(ThreadPoolExecutor.java:587)
at java.lang.Thread.run(Thread.java:841)
Caused by: java.lang.NullPointerException
at libcore.net.UriCodec.encode(UriCodec.java:132)
at java.net.URLEncoder.encode(URLEncoder.java:57)
at com.jmsliu.rssreader.PostViewFragment$DownloadWebContent.doInBackground(PostViewFragment.java:109)
at com.jmsliu.rssreader.PostViewFragment$DownloadWebContent.doInBackground(PostViewFragment.java:103)
at android.os.AsyncTask$2.call(AsyncTask.java:288)
at java.util.concurrent.FutureTask.run(FutureTask.java:237)
… 4 more
java.lang.OutOfMemoryError
at dalvik.system.VMRuntime.newNonMovableArray(Native Method)
at android.graphics.BitmapFactory.nativeDecodeStream(Native Method)
at android.graphics.BitmapFactory.decodeStreamInternal(BitmapFactory.java:635)
at android.graphics.BitmapFactory.decodeStream(BitmapFactory.java:611)
at com.jmsliu.rssreader.adapter.PostItemAdapter$DownloadImageTask.onPostExecute(PostItemAdapter.java:171)
at com.jmsliu.rssreader.adapter.PostItemAdapter$DownloadImageTask.onPostExecute(PostItemAdapter.java:102)
at android.os.AsyncTask.finish(AsyncTask.java:632)
at android.os.AsyncTask.access$600(AsyncTask.java:177)
at android.os.AsyncTask$InternalHandler.handleMessage(AsyncTask.java:645)
at android.os.Handler.dispatchMessage(Handler.java:110)
at android.os.Looper.loop(Looper.java:193)
at android.app.ActivityThread.main(ActivityThread.java:5304)
at java.lang.reflect.Method.invokeNative(Native Method)
at java.lang.reflect.Method.invoke(Method.java:515)
at com.android.internal.os.ZygoteInit$MethodAndArgsCaller.run(ZygoteInit.java:824)
at com.android.internal.os.ZygoteInit.main(ZygoteInit.java:640)
at dalvik.system.NativeStart.main(Native Method)
Please i need a guild on how to integrate push with Blogger and Rss feed. please help me.
I am sorry that I am too busy to create a tutorial for Blogger and Rss Feed. But I think you can easily create one basing on my current tutorial, as the only difference between WordPress rss and Blogger rss is xml.
this is very informativ thank you so you only build android rss reader and your data base its from you website
I create this example for WordPress powered website. So it will be suitable for all wordpress website with my rss plugin
Hi Sir
Can you do this one with new methods
I hope I can get a time to finish the new one.