UICollectionView is widely used in iOS apps. The most common example is the iOS photo app, which has a stylish way to display all photos in grid view or stack view. The collection view provide a simple way to let us build complicated layout by customising its cell view. Different from table view, collection view will show its cell views in grid layout. Each cell view can have different width and height. Therefore, it gives us more room to make special layout by UICollectionView.
Recently, I am going to create a file manager which will look very similar with iBooks, but will show cover and title altogether with different size. In the future, we can simply use this component in many apps, such as mp3 album app, file download manager app, or comic books app.
Start a Simple App with Collection View
Similar with UITableView and UITableViewCell, the collection view is also made up of UICollectionView and UICollectionViewCell. Additional, we can also customize the layout by setting collectionViewLayout. To build up a grid style view with UICollectionView, we can implement following delegates:
- UICollectionViewDelegate: the delegate set up the collection view.
- UICollectionViewDataSource: the delegate provide the data source for collection view.
- UICollectionViewDelegateFlowLayout (optional): UICollectionView provide us a flow layout. When we use the default layout, we can use this delegate to configure the layout such as size of items and the spacing between items. We can also set collectionViewLayout as our customized layout.
In this example, I will use the default flow layout to show a collection of images. To make the example simple to understand, I will show 5 images with different dimension. All images will build in the app bundle.
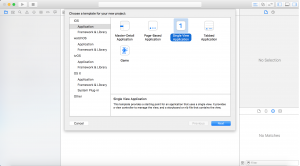
First let’s create a new project with “Single View Application”, named collectionViewExample. By default, there is a default ViewController in the “Main.storyboard” and a ViewController.swift file.
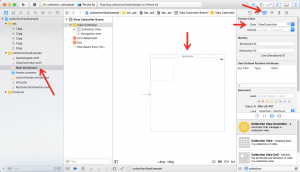
Select the Main.storyboard in file navigator panel, then drag a “Collection View Controller” from object library panel to the storyboard. Choose collectionViewController and set “Is Initial View Controller”. In the end, delete the default ViewController.
Then, we can select Collection View Controller, set custom class as “ViewController”.

In next step, please change the file ViewController.swift as following.
import UIKit

class ViewController: UICollectionViewController {
    override func viewDidLoad() {
        super.viewDidLoad()
        // Do any additional setup after loading the view, typically from a nib.

        //self.collectionView!.registerClass(MyCollectionViewCell.self, forCellWithReuseIdentifier: "mycollectioncell");
    }

    override func didReceiveMemoryWarning() {
        super.didReceiveMemoryWarning()
        // Dispose of any resources that can be recreated.
    }
}
Customize Collection View Cell
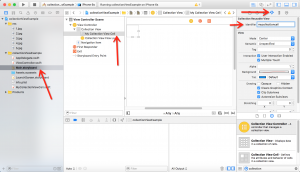
In following steps, we will customize collection cell in storyboard. In our customized collection cell, I will insert an image view and a label. So in the storyboard, let’s select “collection view cell” and set the identifier as “mycollectioncell”. Then set the size as “Custom” and set both width and height as 180.
Then we can drag an ImageView and a label into cell. After setting the constrain, the custom cell view will look like this:

In last step, I create a cell class “MyCollectionViewCell.swift”, and bind image and label reference inside.

Here is the source code of “MyCollectionViewCell.swift”:
import UIKit

class MyCollectionViewCell: UICollectionViewCell {


    @IBOutlet weak var coverImage: UIImageView!
    @IBOutlet weak var nameLabel: UILabel!

    override init(frame: CGRect) {
        super.init(frame: frame);
    }

    required init?(coder aDecoder: NSCoder) {
        super.init(coder: aDecoder);
    }
}
Implement Necessary Delegates
As we mentioned before, we have to extend two delegates at least. Since we are using UICollectionViewController, it already extends those delegates, so we can just override the delegate functions in ViewController.swift. Let’s add following code in this file:
    let bookinfo = [["Book1", "1.jpg"],
                    ["Book2", "2.jpg"],
                    ["Book3", "3.jpg"],
                    ["Book4", "4.jpg"],
                    ["Book5", "5.jpg"]];

    override func numberOfSectionsInCollectionView(collectionView: UICollectionView) -> Int {
        return 1;
    }

    override func collectionView(collectionView: UICollectionView, numberOfItemsInSection section: Int) -> Int {
        return bookinfo.count;
    }

    override func collectionView(collectionView: UICollectionView, cellForItemAtIndexPath indexPath: NSIndexPath) -> UICollectionViewCell {

        let cell:MyCollectionViewCell? = collectionView.dequeueReusableCellWithReuseIdentifier("mycollectioncell", forIndexPath: indexPath) as? MyCollectionViewCell;

        // Configure the cell
        return cell!;
    }
At this moment, we can run the app and see how it will looks like:

Oh, no :(. It looks a little bit funny. Let me set the collection view background color as white. Then we have to implement some optional delegate functions. As we are using default UICollectionViewFlowLayout, we can override following functions to set the size of cell view and space between each cell view.
    override func collectionView(collectionView: UICollectionView, willDisplayCell cell: UICollectionViewCell, forItemAtIndexPath indexPath: NSIndexPath) {
        //(cell as! MyCollectionViewCell).nameLabel.text = "HELLO";

        // Configure the cell
        let picFile:String? = bookinfo[indexPath.row][1];
        (cell as! MyCollectionViewCell).nameLabel.text = picFile;
        (cell as! MyCollectionViewCell).coverImage.image = UIImage.init(named: picFile!);
    }

    func collectionView(collectionView: UICollectionView, layout collectionViewLayout: UICollectionViewLayout, insetForSectionAtIndex section: Int) -> UIEdgeInsets {
        let sectionInsets = UIEdgeInsets(top: 50.0, left: 20.0, bottom: 50.0, right: 20.0);
        return sectionInsets;
    }

    func collectionView(collectionView: UICollectionView, layout collectionViewLayout: UICollectionViewLayout, sizeForItemAtIndexPath indexPath: NSIndexPath) -> CGSize {

        let picFile:String? = bookinfo[indexPath.row][1];
        if(picFile != nil) {
            let img = UIImage.init(named: picFile!);
            var size = CGSize.init(width: img!.size.width, height: img!.size.height);
            var scale = 1.0;
            if(Int(size.width) > minWidth) {
                scale = Double(minWidth) / Double(size.width);
                size.width = CGFloat(minWidth);
                size.height = CGFloat(Double(size.height) * scale);
            }

            size.height = size.height + 21.0 + 15.0; //21 is lable height, 15 is top and bottom gap

            return size;
        } else {
            return CGSize(width: 100, height: 100);
        }
    }
After setting the width and height, we can run the app and see if there is any changes.

FAQ 1: Black Screen without Collection View
When I am developing this example, the first problem I met is the black screen problem. When I run the app, I always get a black screen instead of UICollectionView. After I set the background color of UICollectionView as white, then I just get a white screen. Actually, the problem is that I use following code in viewDidLoad function:
self.collectionView!.registerClass(MyCollectionViewCell.self, forCellWithReuseIdentifier: "mycollectioncell");
Actually, we don’t need to call registerClass function if we setup our custom cell in storyboard (like what I did above). registerClass function is only used when we customize cell programmatically. After I comment above code and run the app, I get the collection view showing correctly. Here I want to mention another function registerNib. We can use this function when we customize collection view cell by xib file.
Donate $0.99 to Get Full Source Code
To reduce my server cost, I wish you can respect my working and you will get the full source code after donation.


